
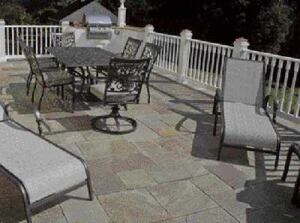
My company builds decks, and every so often a customer wants one with stone or concrete pavers rather than the usual decking materials. A client we recently worked with wanted his deck to match a stone patio below — which he wanted to be dry, with a finished ceiling above to boot.
We made the deck above watertight and framed it stoutly enough to support a covering of the same material that would be used to pave the patio. Laying the pavers was pretty straightforward, but before we were ready to put down the stone there were a lot of details to nail down: the weight of the stone surface, the amount of support it would need, waterproofing, mounting the newel posts, drainage, and so on.
When you lay pavers — whether natural stone or cast concrete — on the ground, you typically install them on a bed of 6 inches of compacted crushed stone that's topped with a 1-inch layer of sand. The sand is used to fine-tune the elevation as the pavers are placed.
Once the pavers are set, you brush polymeric sand between the joints and water it down. It then permanently adheres to the pavers and solidifies within the crevice. Normal sand, on the other hand, washes out, dirt blows in, and then the weeds grow.
On a deck, the approach for installing pavers differs mainly in the base (Figure 1). Six inches of crushed stone is out of the question, of course. It's not necessary, and would add tons to the load on the deck.

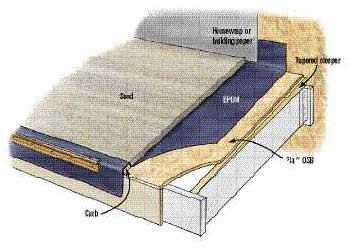
Figure 1. The details that go below the pavers count the most. They begin with a stout frame to support the additional load, followed up with an OSB floor that's topped with an EPDM waterproofing layer. One inch of sand follows to make a bed for the pavers.
Tapered sleepers provide a 3/16-inch-in-12-inch pitch for drainage. The EPDM waterproofing runs up the house wall at least 6 inches and is adhered to the wall. The housewrap or building paper serves as counterflashing.
Only the sand — still a 1-inch layer — is used below the pavers, to allow adjustment for variations in the thickness of the pavers. But even without the crushed stone, the framing, which includes an OSB substrate, must be beefed up to support the weight of the pavers.
Whether on the ground or on a deck, pavers must drain. Most of the water will run off the paver surface, and some will drain through the sand below. Water that gets under them and stays there can freeze and expand, which can crack the masonry.

On grade, you slope the ground and the base to provide drainage. Paved decks must slope as well, and there's an added complexity of protecting the framing from water, for which we use EPDM roofing.
Framing for Paving
Because the dead load for masonry pavers is greater than that for wood or composite decking, the span tables in the IRC are of little use. You have to calculate the actual weight of the materials and engineer the structure and its attachment for that amount (see sidebar, "Common Material Weight," left).
When designing, I start from the top down, adding in the weight of the stone, sand, framing, and so on. For example, dry sand weighs about 100 pounds per cubic foot, so the 1-inch layer of sand under the pavers adds 8.33 pounds per square foot to the dead load. The combined live and dead loads for a masonry-topped deck can run 100 pounds per sq. ft., which is double the standard load for a deck.
Most of the calculations for this deck were done on my computer using StruCalc (see sidebar, "Software for Engineering"). The footings had to be 30 inches square and 12 inches thick and incorporate rebar. The posts were pressure-treated 6x6s. The rest of the structure was a hybrid of standard deck framing and house framing.

To provide a base for the EPDM roof membrane, we used a 3/4-inch tongue-and-groove OSB subfloor over 2x12s placed 8 inches on center. An alternative that would have also satisfied the load calculations would have been to set doubled 2x12s on 16-inch centers.
I went with single joists spaced twice as close, to improve the weight distribution. Also, the tighter spacing halved the span of the OSB, minimizing deflection. I used LVLs engineered by the supplier for the beams supporting the outside of the deck.
Because the deck was going to be watertight, it wasn't necessary to use pressure-treated joists. Further, there was a good reason to use untreated lumber. Treated material can range in width by as much as 3/8 inch, which makes getting a flat deck with a uniform pitch more difficult. Untreated lumber is far more uniform.
Perfect Pitch
For water to drain off the deck, the framing has to pitch away from the house. There were two complications in this design that made it challenging to both pitch the deck surface and have the deck meet the house at a level line all the way around: The deck wrapped around a corner and it terminated against an ell of the house (Figure 2). As a result, it had to be formed like a shallow hip roof at the corner, and like a roof with a valley at the ell.

Figure 2. To keep the deck level where it intersects the house, while still fostering drainage, it's framed like a roof with hips and valleys. The joists themselves are set level, and tapered sleepers are secured atop the joists.
So I framed the floor as I would a roof — using a beefed-up diagonal "hip joist" at the corner and a similar "valley joist" springing from the corner of the ell. However, sloping the joists themselves would have complicated the floor framing tremendously. Instead, I ran the joists level and fastened tapered sleepers on top of them to create the pitch. This approach also kept the ceiling below flat, easing its finish work.
To determine the elevation at which the ledger would anchor to the house, I worked down from the bottom of the doorsill and deducted the stone thickness, an inch for the sand, 3/4 inch for the OSB (the EPDM thickness is negligible), and the height of the sleepers at their thick ends.
To find the sleeper height, I multiplied the pitch of 3/16 inch per foot by the length of the joists, 16 feet. That gave me a maximum sleeper height of 3 inches.
The sleepers were cut from 16-foot-long 2x4s, two from each piece. To begin, I picked a straight 2x4 and chalked a diagonal line from end to end, going from 3 inches down to nothing. This first sleeper became the pattern for marking the rest.
If the 2x4 being marked was crowned, I kept the pattern aligned with the crown as I was penciling the cut line. The crown doesn't matter, as the sleeper will lay straight when it's fastened to the top of the joist. I used PL Premium adhesive (800/999-8920, www.stickwithpl.com) and Dec-King screws (ITW Buildex, 800/284-5339, www.itwbuildex.com) to fasten the sleepers to the joists.
I also used PL Premium and Dec-King screws to fasten the 3/4-inch OSB to the sleepers. It's important not to leave oversize gaps between the sheets of OSB, and to keep adjoining sheets level with one another. This is the surface that supports the EPDM, and big irregularities can lead to leaks. Once the OSB was installed, I went over the joints with a right-angle grinder and 40-grit paper to make fast work out of smoothing out the edges. It doesn't need to look good, but it does need to be smooth.
At the outer edge, I created a 1-inch-high-by-1 1/2-inch-wide curb to retain the sand. Since this curb would contain water as well as sand, I made one 4-inch-wide drain port for every 100 square feet of deck (Figure 3).

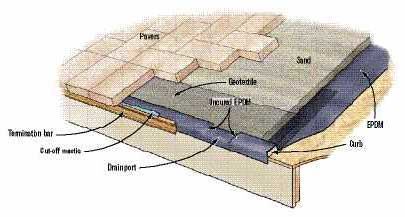
Figure 3. One drain port is needed for about every 100 square feet of deck. A drain port is a 4-inch section where the curbing is removed. Uncured EPDM is fitted and glued to the main membrane to waterproof the interruption. Geotextile wraps the sand to hold it in place.
The EPDM termination must be watertight and — because it's visible from below — aesthetically pleasing. A U-shaped termination bar bent from 16-ounce copper is nailed to the curb, capturing the overhanging EPDM. The EPDM is trimmed flush to the bottom of the bar, and a bead of water cut-off mastic seals the top of the bar.
Roofing the Deck
A good resource is the detailed online installation instructions that manufacturers of EPDM — such as GAF and Firestone — provide. If you are not confident, however, about applying EPDM roof membrane, use a qualified roofer who can guarantee the job will be watertight. The last thing you want is a leak.
Because my company has experience installing EPDM, we placed the membrane ourselves. Without going into full detail, here are some highlights of the process.
EPDM comes in several thicknesses. For added durability, I use 60 mil rather than the lighter (and cheaper) 40 mil. It's always best to install EPDM on a sunny day, as the warmth makes it more flexible and it lays flatter. While the EPDM can be held down with just the weight of the sand and the pavers, I prefer to glue it down with EPDM mastic to prevent any shifting.
Where the EPDM meets the house, I run it up the wall at least 6 inches, adhering it directly to the house sheathing. The housewrap or building paper is then brought down over the EPDM to form the counterflashing. Inside corners are best folded to avoid cutting the EPDM, but outside corners need to be cut.
Seal the cuts with pieces of flexible, uncured EPDM. While uncured EPDM is very stretchy and adheres well with the proper glue, it's not UV stabilized, so be sure it's covered up by other materials. After the patch is on, apply a caulking bead of water cut-off mastic along the edges of the patch.
At the outside perimeter, the EPDM should roll over the curb and hang 6 inches to 8 inches over the fascia. EPDM roofs are normally fitted with an aluminum termination bar, but I don't care for the way it looks.
Instead, I bend one up from 16-ounce copper. This goes on over the EPDM and is nailed through it into the fascia and the framing. The EPDM is trimmed off even with the bottom of the termination bar, and a bead of water cut-off mastic seals the termination bar to the EPDM, keeping water from running between them.
Newel posts can be constructed in a couple of ways. For one, you can frame pressure-treated 4x4s into the deck (Figure 4). The 4x4 needs to be shaved down to 3 inches square for 6 inches up from the deck to accommodate the flashing and allow it to end flush with the 4x4's face.

Figure 4. Newels can be fairly traditional 4x4s let through the deck and bolted into the framing. For 6 inches above the deck, the 4x4 must be trimmed to 3 inches square so that the uncured EPDM flashing ends up flush with the upper newel's face. A sleeve dropped over the 4x4 finishes off the job.
The flashing used in this case is uncured EPDM. Sliding a composite newel sleeve or boxed newel over the 4x4 then hides the flashing.
A simpler approach is to use a pre-made "quick-mount" galvanized pipe with flange (Figure 5). Solid framing needs to be installed ahead of time at newel locations. The flanges can be laid on top of the EPDM as a pattern, and the EPDM can be cut and removed. This way, the flange rests directly on the OSB and can be shimmed plumb before it's bolted to the framing.

Figure 5. A simple way to construct a newel is to bolt a newel mount, consisting of a steel flange and pipe, to the framing. The EPDM directly below the flange is removed, and the assembly is flashed with uncured EPDM. A pair of V-grooved 2x4s screwed around the pipe provides mounting for the finish sleeve.
To flash, you can use uncured EPDM or pre-made EPDM boots used for roof pipe protrusions. The newel sleeve slides over the quick-mount pipes, and manufacturer-supplied donuts fill the void between the pipe and the sleeve. If you need to make your own, just cut a "V" into the flat side of a couple of 2x4s and sandwich the pipe with one on each side.
Don't put the sleeves on until the pavers are installed.
Paving
Before installing the sand, I lay geotextile fabric along the outer perimeter at the drain ports. The geotextile allows drainage while keeping the sand in place. I extend the geotextile about 2 feet on both sides of the drain port and about 2 feet onto the deck, leaving about a foot overhanging the curb. This gets folded back on top of the sand later on.
The inch-high curb acts as one guide for laying out a uniform layer of sand. I snap a chalkline along the house 1 inch up from the EPDM for another guide.
To keep the sand consistent between these points, I lay lengths of 1-inch PVC pipe perpendicular to the wall to guide the screed (Figure 6). I use three lengths at a time, which allows me to screed the tops of at least two sections at a time.

Figure 6. Laying a uniform layer of sand requires guides. One-inch PVC pipe laid on the deck works well to guide a screed. Once the sand in that section is leveled, the pipe is removed and the voids filled with more sand.
I work from the house outward, lifting the pipes out as I finish each section. I just hand trowel some sand into the voids left by the pipes. In the end you should have a 1-inch layer of sand on the whole deck. To avoid uneven compaction, don't walk on the sand.
I usually start paving where the steps are, to make it easier to bring material to the deck. The pavers near the steps shouldn't overhang more than an inch so the stone doesn't flip up when it's stepped on (Figure 7).

Figure 7. Pavers should be glued to the curbing, and overhang the steps by only an inch to prevent them from being overturned.
Working from the step location toward the house, I lay one full paver width around the perimeter to make a border, then fill in the field with stone. The edge stone is glued down to the EPDM curb with a stone construction adhesive. The pavers are set in the sand and tapped home with a rubber mallet.
With irregular natural stone, you may need to scoop out or add in sand to make the surface even. Concrete pavers, on the other hand, are uniform in thickness, so they install much faster than stone.
Whether concrete or stone, pavers are cut using a diamond blade in a circular saw or angle grinder. You can also rent a special table saw. If you've never done this before, you should allow time for the learning curve. To finish the job, polymeric sand is swept into the joints, and wet down per the instructions on the bag.
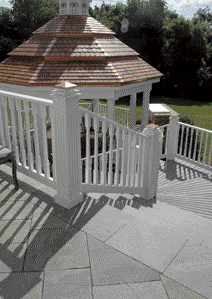
At this point, all that's left is to install the railing. The process isn't much different from what you'd do on any other deck. If you are using base skirting at the bottom of the newel sleeves, keep the sleeves about 1/4 inch above the pavers to avoid wicking, and let the base skirt meet the pavers.
The value of this system is not only in the pavers' low maintenance and longevity, but also in the all-in-one roof system you just built for the patio below. To finish off the area below such decks, we normally install beadboard ceiling and wrap the beams with moldings.
Robert Viviano owns Deck the Yards, in Pittsburgh.


