
As the owner of a deck design/build firm, I have found that very few projects are what might be called “standard.” Most have some element or site limitation that requires a creative solution — which in my area of Pennsylvania frequently means designing the deck to be freestanding instead of attached to the house.
To Attach or Not to Attach
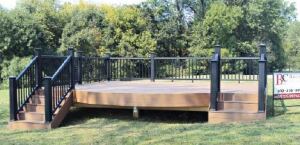
Several common situations call for a deck to be freestanding. Maybe there’s no supporting structure adjacent, as when the deck is in the middle of a lawn or around an aboveground pool (Figure 1). Or a deck may have a small connection to another structure, but not enough to borrow any stability from it (Figure 2).

Figure 1. Isolated decks, like those built around aboveground pools, have to be freestanding.


Figure 2. Decks that have only limited contact with an existing structure must be freestanding.
Sometimes the house has limitations that make attaching a deck to it impossible or undesirable. For instance, it’s a code violation to attach a deck to masonry veneer. Stuccoed houses have other challenges. Penetrating synthetic stucco could open the house to leaks — anyone who was in the building trades in the 1990s will be aware of the havoc that a leak in synthetic stucco cladding can create. And traditional three-coat stucco is difficult to cut and flash. For such houses, it’s often easier to build a new deck as a freestanding structure than it is to deal with the cladding.
The recent code revisions regarding lateral-load support, along with the various interpretations I’ve heard from local code officials, have prompted me on a number of occasions to build a freestanding deck where previously I’d have put in a standard ledger and beam system (Figure 3). Of course, this adds a beam up against the house, and often I will still secure the ledger to the house for lateral bracing, but not for primary support.

Figure 3. Sometimes, it’s easier to build a freestanding deck than it is to comply with the new lateral-bracing codes that apply to decks with ledgers.
Other cases where I’ll build a freestanding deck include when the house is old and I’m uncertain about the house-wall construction, or when the new deck will attach to an old deck (Figure 4).

Figure 4. Some homes and, as in this photo, some existing decks simply can’t support a ledger for a new deck addition.
Freestanding-Deck Concerns
Though you don’t have to worry about proper ledger attachment and flashing when you build a freestanding deck, you do have to figure out how it will support itself without the help of a big, strong house. Forever. Because of this, you must consider things — like uplift resistance and racking — that aren’t as big an issue with attached decks.
Uplift is a concern because a freestanding deck doesn’t have a house holding one end down; therefore, all the sides must be secured to footings. Whether a group of parents runs to the edge of the deck to watch the kids gather Easter eggs, or a roof over the deck catches a bad gust of wind, it is possible to tip a deck by loading one end. Proper footings and hardware that forms a continuous load path from the framing to the footings are critical (Figure 5). In the north, frost footings may be deep enough in the ground to resist uplift. In the south, you might need to dig footings deeper than you would for an attached deck and have them engineered.
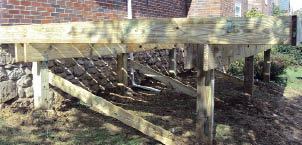
Figure 5. Freestanding decks must resist wind uplift. The right hardware can provide a continuous load path from the framing to the footings.
As you would with an attached deck, consider possible future uses. Down the road, a new owner might install a 12-person hot tub on a deck designed only for normal loading. If, when designing, you think worst case instead of ideal scenario, you might save yourself and others a headache in the future.
Something to keep in mind for a freestanding deck adjacent to a house is that the support posts will typically be in the over-dig next to the house. To land on undisturbed earth, the footers must extend down to the original house-footer depth. On some properties that’s not a big deal, but if the basement is 9 feet deep and the ground comes all the way up to the first floor, you could be in for quite the excavation.
Addressing Lateral Movement
Decks must be designed not just for standard loads, but for “what if” scenarios as well. What if your client thinks the new deck out by the garden is the perfect place to host a Just Dance competition? We know from high school science classes that for every action there is an equal and opposite reaction. Thirty people doing the Alligator at the same time is a lot of weight shifting from one side to the other. Imagine that, and add a set of floating steps on the corner that slides when the deck moves in one direction, but digs in when it moves the other way. That would load the framing at every joint and potentially ratchet it enough for it to twist or even collapse.
The solution to most problems is bracing (see “Bracing Details”). But where and how? Bracing designed to resist motion parallel to the house is familiar to most deck builders. Typically, it consists of 4-bys bolted at an angle between the posts and the outer beam (Figure 6). Freestanding decks also need to be braced parallel to the joists (Figure 7), something not needed on most attached decks because the house braces them in this direction.

Figure 6. Standard bracing between posts and the outer beam is used on freestanding decks, as it is on many decks attached to houses.
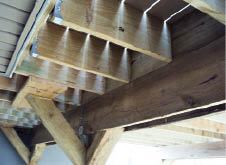
Figure 7. Unlike decks attached to houses, freestanding decks must be braced perpendicular to the house.
An engineer or inspector might detail a specific bit of bracing, but don’t stop there and rush into construction. Think about how the structure will age and look for potential areas of weakness or movement, then find ways to permanently address those problems. A brace needs to be strong enough to do its job years into the future. Simple nails or screws can pull out as wood dries, so use bolts, brackets, and hardware whenever possible.
Additionally, freestanding decks need to be kept from twisting. Sometimes, the geometry of the framing itself will brace a deck against twisting (Figure 8). Installing the decking at an angle will also help (Figure 9), as will design elements like corners, landings, and steps, if they’re secured to footings (Figure 10). Other times, you’ll need to figure out some other approach, such as lagging a 2x4 diagonally across the bottoms of the joists.

Figure 8. Angled framing creates triangular shapes that brace decks against racking.

Figure 9. Angled decking adds rigidity to a square frame.

Figure 10. Stairs that are secured to footings can help to brace a deck.
Finally, don’t forget form in the shadow of function. Look for opportunities to mask the supports or build them in a way that adds to the overall design (Figure 11).

Figure 11. Think about aesthetics when bracing, and blend the structural members into the deck’s overall architecture.
Alternative Solutions
Movement can sometimes be mitigated by extending the supporting posts down below grade to a footer, instead of attaching them to an at-grade pier (Figure 12). The compacted dirt around the post acts as a brace, and helps prevent the structure from lifting. Buried posts also come into play for very low decks (Figure 13), and extending buried support posts up through the deck and the framing into the railing can make very sturdy guardrail posts (Figure 14).

Figure 12. With deep footings, burying the support posts can help to brace the deck.

Figure 13. Buried posts may be the only practical way to brace a low deck.

Figure 14. Buried posts extended through the framing can make solid guardrail posts.
On a roofed deck, extending a post from the footing up into the roof framing can help keep the entire structure secure (Figure 15). The sheathing on the roof and the gabled ends helps the roof resist twisting or moving, and with good, solid connections, some of that rigidity can be transferred to the deck.

Figure 15. Tying roof framing through the deck framing to the footing stiffens the entire structure.
Ramps, though smaller than decks, pose their own challenges. We usually build several ramps each year, most designed to be short-term solutions. While they must be safe and secure, they also need to be easily removed without leaving permanent damage to the property once they are no longer needed. Often they float over existing walkways that limit where posts can be installed. One way to secure these temporary structures is to backfill the framing with dirt or stone. Though not an ideal long-term solution for a large deck structure, it’s great for this use (Figure 16).

Figure 16. Low decks and ramps can be stabilized by backfilling the framing with dirt, or better, gravel.
Many multilevel decks end up being at least partially freestanding. Such a structure must be planned so that each stage or section can stand alone, even as all the pieces together function as a complete project. For instance, two separate deck levels might be able to share a support post (Figure 17). Think about the uses of the deck sections — if there is a roof, hot tub, or other additional load, you may need a larger footer, more posts, or an engineer’s review.

Figure 17. The different parts of a multilevel deck must be designed to be freestanding. However, look for opportunities to share loads among posts and footings.
One last consideration: If you’re not sure, consult with someone who is. It is always better to chat with another builder, an engineer, or your code official when you’re trying to resolve design challenges than it is to guess and risk failure.
Matt Breyer owns Breyer Construction and Landscape in Reading, Pa.


