
I’ve heard people call a pergola anything from an arbor, a colonnade, or a trellis to “one of those garden things.” But regardless of what my clients call them, I enjoy building them. The balance of site work, layout, and trim is just right.
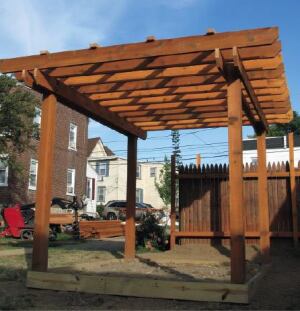
Plus, they’re profitable. Since pergolas are luxury items, the budget to build one is usually large enough that I can use nice materials and take extra time, as I did even on the fairly modest project I describe here (see photo, right). I was able to carefully prepare the site — providing drainage and a buried electrical line as well as a level pad — build a template, and use custom-finished rough-sawn cedar.
Getting Proportions Right
Proportion is key when designing a pergola. You need a decent eye to “Goldilocks” the measurements or you may end up with a pergola that’s too skinny and tall, and that looks like a tower.
While there’s no need to be slavish to it, the golden ratio of 1:1.618 is a good starting place. For example, if the overall height you have in mind is 96 inches, try a length of about 155 inches (96 x 1.618 = 155). You can sketch it out on graph paper or your computer to get a sense of what it will look like. The pergola in this article is typical of what I build, though its dimensions were dictated more by what would fit best in a small, urban backyard than by any respect for classical proportions: It’s 12 feet long by 10 feet wide by 105 inches tall, with 88 inches below the girders.
As a practical matter, the bottom of the girders should be no less than 80 inches high (the same as an interior doorway); if customers want a ceiling fan, the pergola must be tall enough to allow at least 88 inches under the blades. I like to make the overall length of the girders a multiple of 16 inches so rafters lay out predictably. When the girders are cantilevered beyond the posts or the rafters are cantilevered beyond the girders, any overhang shorter than 12 inches looks truncated — I went with 18-inch overhangs here.
Site Factors
Remember, too, that the pergola will look different from various vantage points. It’s worth a few minutes of your time to investigate the sight lines from the house, the interior windows, and any other point from which the pergola will be visible. If you can see the top of the pergola from a second-floor window, for example, you may want to route wires or conduit for a ceiling fan so that they’re hidden. Will the pergola block the view of a favorite shrub or ornamental tree? Will it look crowded in the corner? You need to do the footwork to know what issues you’ll need to address.
In this project, the pergola was to be set in a corner of the yard, and its rough location was pretty much determined by the existing fences on the adjacent properties and a required 4-foot setback from the property line. Nevertheless, I spent a considerable amount of time measuring from known control points that I found on the property’s plat plan. It was no surprise to learn that the fences were not built on the true property lines, and I made sure to reference the control points rather than the fences when laying out the pergola.
Once I knew the pergola’s footprint within a few inches, I graded a level pad using a Toro Dingo (888/384-9939, toro.com) with a bucket attachment (Figure 1). The machine, a bucket, and an auger cost me $245 per day, plus delivery. Part of the reason I rented the Dingo for this job was that an existing brick fireplace was in the way — the Dingo was a great help carting away the debris. I also used the Dingo and a trencher attachment (rented at additional cost) to drop a 30-foot-long, 24-inch-deep trench to bring power to the pergola. That took about 20 minutes.
Figure 1

Prestain the Wood
Because this project called for a refined, natural feel and durable materials, I used rough-sawn western red cedar, 6-by and 2-by. It delivered the right look, though the labor to finish the cedar added to the budget.
The Western Red Cedar Lumber Association (866/778-9096, wrcla.org) recommends finishing cedar with a solvent-based stain prior to installation. Finishing extends the life of the material, especially when it’s in ground contact (Figure 2). To that end, I used two coats of solvent-based, pigmented DeckScapes stain (Sherwin-Williams; 800/524-5979, sherwin-williams.com). The pigment adds luster to the wood and delivers some UV protection.
Figure 2

The rough-sawn wood thirstily sucked in the stain, and each coat took more than 24 hours to dry. I stained the cedar before construction and allowed a day’s drying time after the final coat — while I started the dirt work.
Sandbox Template
A cornerstone to my approach to building pergolas is the full-size template I fabricate. Instead of fussing with string to define a pergola’s perimeter, I build what I call a sandbox. I use it to confirm the size and location of the structure, and also to lay out and anchor the posts. Whether I leave the sandbox in place or remove it when construction is complete depends on the pergola’s design.
The sandbox for this project was to remain in place to establish a level area below the pergola and contain dirt for a spot of lawn — it could also have been used to contain a base for a hardscape such as pavers or bricks.
I built it out of 2x8 stock such that the interior dimensions were the same as the outside dimensions of the pergola (plus a 1/4-inch fudge-factor). After squaring it, I braced each corner with a diagonal 2x4 (Figure 3). Then, before positioning the sandbox for final layout, I hacked out a trench about 8 inches wide and 6 inches deep around the perimeter and filled it with 3/4-inch gravel to provide drainage under the box. The gravel also eased dialing in the template’s final position.
Figure 3

I remeasured from the property lines and the house, and precisely positioned the sandbox. Then I marked where the center of each post hole would be. Before shifting the sandbox out of the way to dig the holes, I cut a couple of sticks that fit exactly between the sandbox and the fence corner, to make it easier to relocate the sandbox.
Drainage and Anchorage
I used the Dingo to drill 15-inch-diameter post holes at least 36 inches deep (Figure 4). It took about 5 minutes to drill each one. As I drilled, I dropped the dirt toward the center of the pad to keep it off the grass and avoid having to move it twice. The auger leaves loose fill in the hole bottoms, but that’s easily remedied by overdrilling a little and tamping. I followed this by dumping a few inches of 3/4-inch gravel into each hole and tamping it. This layer facilitates drainage around the bottom of the post and is recommended as a best practice by the WRCLA.

With the holes drilled, I replaced the sandbox, laying my measuring sticks between it and the fence as guides. Once I leveled the sandbox in all directions, I was ready for the posts. These I rough-cut about 12 inches longer than the proposed finish height of the pergola; I set them in each corner and screwed them to the box. Because the sandbox was to remain in place after construction, I added construction adhesive before fastening it to the posts.
Next, I plumbed the posts in both directions (Figure 5), then braced them with diagonal kickers (Figure 6). To provide a stable mooring, I mixed and poured a 60-pound bag of quick-setting concrete around the base of each post, on top of the 3/4-inch stone I had tamped in place earlier. When that set up, I finished backfilling the hole with gravel, tamping as I went. I haven’t found anything that delivers a more stable footing faster.
Figure 5

Figure 6

As I moved on to laying out and cutting the girders and rafters, I knew the posts were right where I intended them to be. Because of the stout anchor point, they wouldn’t move, either — I was able to climb all over the structure during the installation.
Girders and Rafters
Step one for the girders and rafters is to crown each one, then cut it to length. The rough-sawn stock I used here had to be squared up on each end. There are countless ways to detail rafter tails, and it’s a cool place to show your personal style.
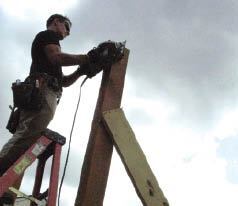
This design, however, called for only a simple chamfer. Cutting these on a miter saw is fast, for sure, but you need some decent infeed and outfeed support when whacking the ends off 14-foot-long 2x8s. Instead, I guided my circular saw with a small square (Figure 7). After cutting the lumber, I soaked the exposed end grain with stain.
Figure 7

Once their ends were cut, I set all four girders on edge and laid out the rafter locations on 16-inch spacing (Figure 8). Turning to the rafters, I marked the bottom of each where it would begin cantilevering beyond the girders, so I wouldn’t have to fumble with my tape during installation.
Figure 8

Next, I marked the post locations on the inside of each girder. Because the posts were plumb and locked in place by the box, I simply laid each girder up to the posts and marked them in place for dead-on accuracy. I generally leave post tops wild so I can double-check the overall proportions before it’s too late to make changes. I can also screw a board to the posts at this point if the homeowner wants to see the final dimensions of the pergola before committing.
When the final layout was settled, I measured up from the sandbox (which I knew was level) and cut the post tops 1 inch below where I wanted the girder top to be (the gap allows for wiring a light or ceiling fan). I made the cut with an 8 1/4-inch worm-drive saw — two passes on each 6x6 post cut it to the proper height (Figure 9).
Figure 9
I also measured from the sandbox to mark the posts where the bottom of the girders would be. To create a design element, I bolted the girders to the sides of the posts rather than cutting a notch or shoulder as I would to support a deck beam. The girders then gave something of the look of a capital, adding a shadow-line and drawing the eye gracefully toward the rafters.
Two-by cleats tacked below the mark on each post supported the girders while I was drilling and bolting them. You can use gun nails or screws, but make sure to set the fasteners in the corners so that they don’t interfere with the through bolts that will secure the assembly.
I laid out the bolt heads evenly on the girder and drilled pilot holes through each girder and the post (Figure 10). I spray-painted the through bolts black — while I’m not sure anybody else notices, I like the way it looks. The nuts went to the inside of the structure, where they were less visible.
Figure 10

With the rafter bottoms and girder tops laid out, placing the rafters on the money was easy. I just toe-nailed (or you can use screws) through each rafter into each girder (Figure 11).

Then, to stabilize the rafters and add another visual element, I nailed 2x4 ties perpendicular to the rafters. I spaced the rafter ties evenly, at about 2 feet on center, and had them overhang the end rafters only slightly so as not to draw much attention. The final step was to touch up the end grain with stain and a paint brush, especially the post tops and the bolt holes.
Finishing Up
A freestanding pergola’s attendant earthwork requires that you either get in touch with your inner landscaper or mason, or sub out those trades. While a lot of pergolas get hardscape floors, they aren’t necessary. The design here, intended to be green and practical, called for grass. And installing sod instead of a hardscape clipped about $3,000 from the budget.
For a lawn that’s been chewed up by crew and equipment, I find the best medicine where I live is simply water, a dose of fertilizer, and some lime. For areas that need to be reseeded, I’ve had terrific luck with Scott’s PatchMaster grass seed and mulch mix. And whether you do that work yourself or sub it out, it’s an important part of delivering the entire package to the customer. Overlooking it is begging for complaints.
Furthermore, I communicate to the customer — verbally and in writing — that seed or sod needs water. Lots of water. I’ll even set up a spike sprinkler so that all the customer has to do is turn it on as required.
Mark Clement is a remodeler and deck builder and a member of the DeckExpo live-demonstration team.


